CV as a code & CI/CD for your CV
I know we are used to keep our CV (resume) in WORD format or in pdf. Most of us techies won’t do the same. We love to keep everything as a code ( I mean literally everything ![]() ) Infrastructure as a code, platform as a code, service as a code, network as a code, why not your CV as a code ?
) Infrastructure as a code, platform as a code, service as a code, network as a code, why not your CV as a code ?
So let’s keep our CV as a code and discuss little bit why it is kinda easy and useful,
- Version Control the CV ( this is pretty cool
 )
) - Automated Building process
- Wide range of freedom for customization
- LaTeX background
One of the perks of keeping something as a code is the version control capability. We can go back to any edit that we did in ease. As an example, when you need a customized CV, create a new branch from the base branch and crack on. Not only that you can automate the building process so that you don’t need to worry about that. Yeah it’s pretty easy to customize and do whatever you want. If u can’t find something, write it yourself and share so others don’t have to. That’s the beauty of keeping something as a code, let’s get cracking.
If we are going to keep the CV as a code, first question is which language should i use to code? LaTeX is not so much a language but it’s pretty close. LaTeX is a document preparing system where you can write in plain text and format using markups. So anyone can use LaTeX as it uses plain text, and you can import stuff and write functions and much more too.
Where to start ?
First you have to come up wit your CV right? So best place to start is by using a template. You can find so many good templates here. overleaf templates Overleaf comes with a good latex editor too. Don’t forget to create a account there and check it out. What you have to do is download the source of the template and create a git repository for it. You can either use a online latex editor such as overleaf or you can download a latex editor for your computer. Search for it there are plenty. I’m not here to teach you how to create your CV so let’s move on to building your CV.
How to build ?
Just as a normal programming language, you have to compile the latex code in order to get the formatted CV. I’m gonna explain here how you can do it in a linux based system.
In ubuntu you can install Tex Live, which you can use to compile LaTeX documents. TeX Live is a TeX distribution to get up and running with the TeX document production system.
sudo apt-get install texlive-full
After installation you can use xelatex command like below to compile your cv.
xelatex <tex file> Ex : xelatex cv.tex
As we are going to automate this, writing the command over and over again not gonna work, let’s create a MAKE file. keep the make file inside your project. Sample make file will looks like below.
# The name of the main .tex file to build.
# Other files can be included into this one.
DOCUMENT = cvOUTPUT = .PDF = $(OUTPUT)/$(DOCUMENT).pdf
LATEX_FLAGS = -halt-on-error -output-directory $(OUTPUT)/
LATEX = xelatex
PDFVIEWER = xdg-open

# File Types (for dependencies)
TEX = $(wildcard *.tex)
BIB = $(wildcard *.bib)
STY = $(wildcard *.sty)
CLS = $(wildcard *.cls)
BST = $(wildcard *.bst)

# TARGETS
###############################################################################

all: $(PDF)

$(OUTPUT)/%.pdf: %.tex $(STY) $(CLS) $(BIB) $(BST)
  mkdir -p $(OUTPUT)
  $(LATEX) $(LATEX_FLAGS) $<

show: all
  @ # Redirect stdout and stderr to /dev/null for silent execution
  @ (${PDFVIEWER} $(PDF) > /dev/null 2>&1 & )

### Clean
# This target cleans the temporary files generated by the tex programs
clean:
  rm -rf *.aux *.
tip : Sometimes when you use different fonts, compilation can fail. So download those fonts and keep them inside the project
When you have the make file, just executing make command will build the CV for you. You can checkout my CV repository here if you miss something.
How to publish to gh pages
It’s too painful if you have to manually update your resume in your portfolio. No worries, we can automate the whole process pretty easily. When you do a change and update your CV it will be available in your portfolio in few minutes of time. In conventional Software development, this is referred as Continuous Integration and Continuous Deployment. Let’s apply the same thing here. Get familiarized with CI/CD here.
In order to do this we need a CICD server. You don’t needs to have your own server silly, there are so many CICD as a service providers. One of such powerful service is Travis. Travis is pretty much straight forward and easy to use. You can sign in with your GitHub credentials and enable Travis for the repos you need. Go ahead Login to Travis and enable it for your CV repository. Travis is completely free for all your public repositories. Pretty cool right. ![]()
Once you have done that you have to create travis.yml file with all the build and deployment instructions inside your repository. When we do a commit, Travis will read this file and do all the stuff you want’s to do. Here is a sample Travis.yml file i created for building and pushing my CV to my blog.
os: linux

before_install:
 - sudo apt-get install -y texlive-full
  - chmod +x blog_push.sh


script:
  # build the cv
  - make

after_success:
 - if [ "$TRAVIS_BRANCH" = "master" ]; then ./blog_push.sh; fi
I have used a linux environment and pre-install all the required packages. Once i have done that we can use the MAKE command to build the CV. When it’s done successfully we can publish it to our blog. I thought of keeping the general resume in master branch and only CV in that branch will be deployed to the blog. I’ve created a blog_push.sh bash file with all the deployment logic. It’s simple as below.
tips : You can optimize above Travis configuration to reduce the build time. Start with a lighter environment and installing only needed packages.
 #!/bin/sh

commit_website_files() {
  git clone https://github.com/Thulana/thulana.github.io.git
  cp ./cv.pdf ./thulana.github.io/assets/cv.pdf cd ./thulana.github.io && git add assets/cv.pdf
  git commit --message "Travis build: $TRAVIS_BUILD_NUMBER - Pushing updated cv to the blog"
  git push https://"${GITHUB_USER}":"${GITHUB_PASSWORD}"@github.com/Thulana/thulana.github.io.git --all
}


echo "pushing to my blog"
commit_website_files
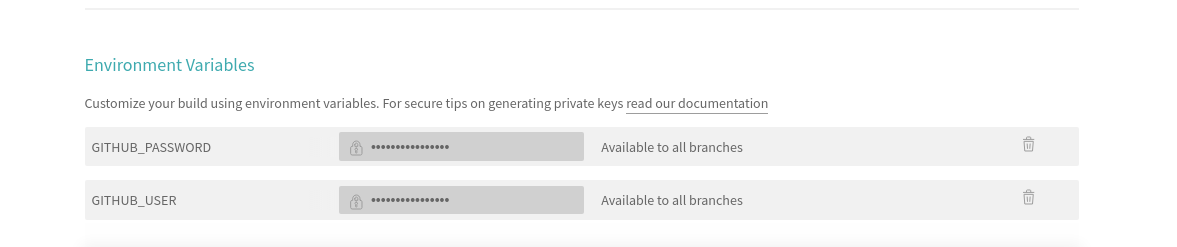
As you can see what I have done here is clone my blog repository and add the freshly built cv to my website assets and commit. Once it’s done, latest version of your CV will be available in your blog. I have added the GITHUB_PASSWORD and GITHUB_USER as secure variables in Travis. So they won’t be visible to anybody. ![]() Check inside Travis settings, and you will find it.
Check inside Travis settings, and you will find it.
Now all set. For every small change in your CV, your blog will be updated with the latest one. You can checkout my portfolio with the resume and the CV repository below,
Checkout my portfolio here : my-portfolio
Checkout my CV repository here : My-CV
If you think this is cool or find interesting, don’t forget to checkout my other articles. Let me know what you think. If there is anything you needs to know, Please contact me.
Cheerio !! ![]()
Leave a Comment